Friday 30 October 2015

Human Hybrid Brief - as seen on MyCourse

Using the concept of physical transformation as a point of inspiration, you are asked to design
a creature character to represent the theme of Brave New World. The basis of your investigation into the theme of Brave New World should range from concept design references, history of prosthetics in TV and film, anthropological and anatomical references. Based on the world of nature you are asked to design and create a human hybrid using silicone appliances. 

You should begin early to find models that are willing to be made over and photographed. You will also need to consider the whole look of your Brave New World character. However, rather than the emphasis being on clothing, you should place emphasis on decorating the body in combination with accessories, which can be made, borrowed or loaned from shops.

To help develop further your research skills with the exploration and experimentation of product and technique, you will develop a blog to record your journey throughout this project. You should look to use your blog as a device to record and be critical of your ideas. Your blog should contain a mixture of drawings, sourced imagery, typewritten reflection and explorative trials. 

In addition to your blog, you will create a moodboard based on the Brave New World theme. You must use your moodboard as the basis for your design development. 


Throughout this brief the testing of your ideas and practicing is of great importance. You should be prepared to spend time outside of taught seminars, lecturers and technical sessions to test your ideas and practice your sculpting skills that are the basis of any successful SFX make-up. 

Unit Submission Requirements

You will need to submit a portfolio in the form of a PDF.  It must include the following:
  • A link to your sketchblog. [The blog must show references to your Brave New World inspirations; anthropological references; subcultural references; human hybrid references; the history of prosthetics; key reading; contextual research; visual reference points, drawings; photographed outcomes documenting your in class technical progression and make-up templates; Bibliography (using Harvard Referencing system) of research sources.]
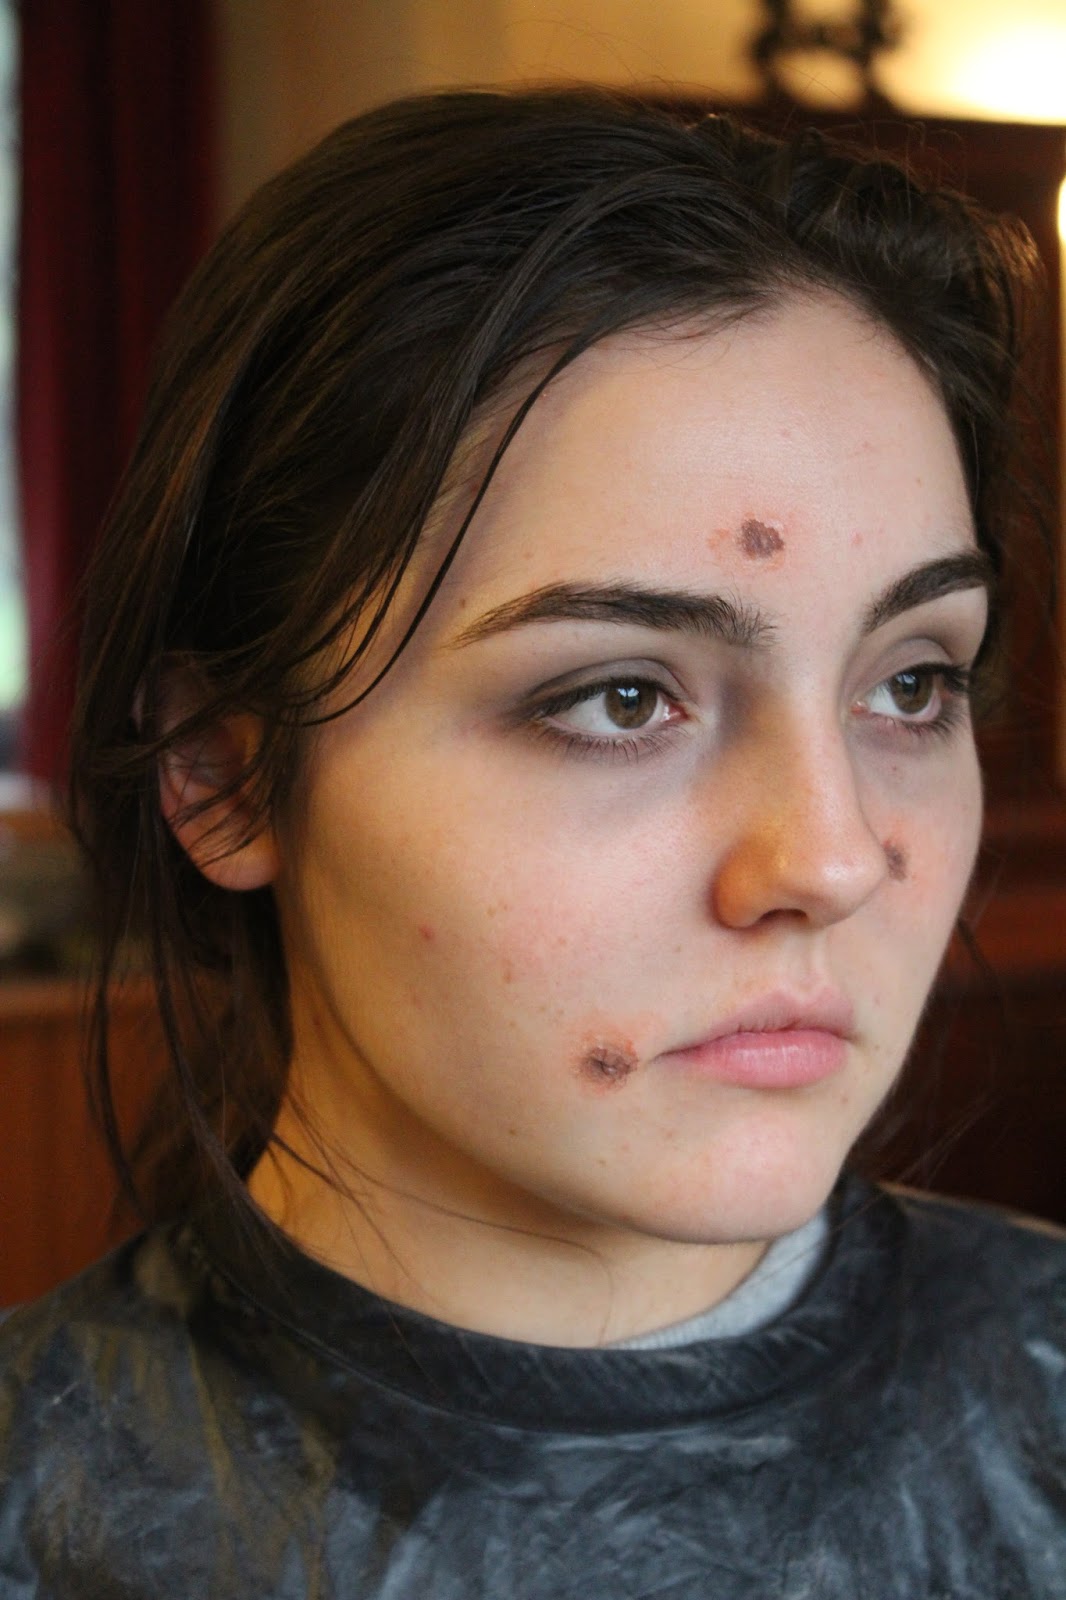
  • 3 images of your wound creation including close-up with no paint job, close-up and mid-shot of camera ready character
  • A moodboard of your Brave New World concept 
  • 3 images of your human hybrid including close-up with no paint job, close-up and mid-shot of camera ready character
  • 250 word evaluation of the project progression, detailing how you solved problems, developed research and created your Brave New World concept.
  • A FMS507 300 word Technical Evaluation discussing what you have learned showing appropriate terminology, assessment of health and hygiene techniques and resources used in special effects make up application and prosthetic production. Posts related to technical requirements simply tag 'Technical Folder'

Thursday 29 October 2015

How to: Apply a Bald Cap

Equipment:
-Cleanser
-Toner
-Hair brush
-Tail comb
-Water in spray bottle
-Hair gel
-Soap
-Bald cap
-Scissors
-Soft pencil
-Spirit gum
-Cotton buds
-Acetone
-Supra colour palette
-Sponge

Step by Step:
1. Clean the model's face with cleanser and toner, but don't as moisturiser; or at least don't apply moisturiser anywhere where you will be applying the bald cap.
2. Brush the hair very well so there are no knots and brush it backwards.
3. Use gel to scrape the hair back, using your fingers and a comb, to make it as flat to the head as possible. Don't use any hair grips or pins as they will show through the bald cap; only use gel.
4. If the model has fine baby hairs, then soap can be used to scrape back and flatten them for a neat look.
5. Put a towel round the model's shoulders and spray the models hair with water.
6. Brush back the model's hair again, constantly adding more gel or water if needed, to make it completely flush and rounded and smooth against the scalp.
7. Once the hair has been smoothed backwards, split the hair into a middle parting with a tail comb.
8. Take each side of the hair and wrap it to the opposite side and smooth it upwards and round, to keep the hair looking as round and true to the shape of the scalp as possible.
9. Ask the model to hold the front of the bald cap and then carefully pull the back over and to the bottom of the head, trying not to disturb the hair underneath. You can ask another person to hold the top of the hair to keep it in place while you pull the bald cap back.
10. Push back the hair with a pin tail comb all the way round the neaten up the edges.
11. Cut a triangle around the ears so that the edges slot around the ears and so that no hair is showing.
12. Use a soft pencil to draw an outline around the edges of the hair, making sure to leave a bit extra because you want no hair showing at all. Ask the model to lean her head forwards when doing the back so that there is enough bald cap to cover the hair when she leans forward.
13. Cut all the way round the bald cap, following the guide lines.
14. Apply spirit gum onto the head and hair, where the bald cap will be secured, and also around the edges of the bald cap.

15. Wait for the spirit gum to get tacky and then smooth the bald cap down all the way around the head. The model's head needs to be leaning forwards when securing the back.


16. Use a baby bud, with acetone, to smooth and blend the edges.
17. Dab some pink/red supra colour all over the areas with dark hair to colour correct them so that, when skin colour is added on top, it blends in with the natural skin seamlessly.


Notes to Remember
-Do not cut the bald cap before application as it may not fit properly.
-Only buy matte spirit gum so that it doesn't look shiny and obvious in studio lighting.
-You can't put bald caps on people with weaves.
-Work the gel through the roots to make it all smooth down more easily.
-You can ask another person to hold the top of the hair to keep it in place while you pull the bald cap back.
-Model needs to keep her eyes firmly shut when using the acetone on the forehead to avoid it getting in her eyes.

My Final Look: Assessment

Wound Close-Ups - No paint job


I am really happy with how my wound came out! I am really happy with how defined and detailed the teeth marks are and how there weren't effected by bubbles or anything. I also also really happy with how neatly I blended out the wound to blend it into the natural skin because there are no harsh lines or unwanted bumps. If I were to do this again, I would have spent more time colouring the latex so that it matched my model's skin tone as I think that would have made it easier to blend in; however I am happy with my paint job so I don't think this was an issue. 

Wound Close-Ups - With colouring

The top image shows the bite mark without any blood and lots of bruising, which is what I originally had designed the bite mark to look like. I added some foundation colour around the bite and all over the latex to make it blend in with the skin seamlessly and I am really happy with how it came out. If you look very closely, you can see some uneven latex round the bottom edge that could have been blended a bit more smoothly; however you wouldn't notice this unless you looked really closely. I really like how I added bruising all round the inside and outside of the teeth marks, using lots of different coloured and my fingers to make it look very uneven and realistic. I kept my research image in front of me at all times so that I could constantly refer to the image. I added a few colours in each tooth mark to give them dimension and depth. I added foundation colour on any parts where the latex separates the teeth so that they didn't loose their individual shape. I added some more purple bruising in the middle as this bit of skin would have been pinched and bruised; this is also what my research image looked like. 


I added some blood to my bite wound, after I had taken my final images, because I wanted to see what it would look like. I was really happy with how they came out and I think it was easier to use blood to make it look realistic because you can hide many errors with the thick blood. I like that the shininess of the blood adds more dimension, however it also means that the detailing of the grooves in the teeth are lost. I really like how the bite looks when blood is added; however I am glad that I chose not to rely on adding blood because it was a greater challenge for me. 

Mid Shot of my Character


I am so happy with how my character came out! I did a lot of researched in the effects of heroine abuse and I think it really paid off as I think the character looks very realistic. I am happy that I didn't use a base because her skin looks very natural and as if she isn't wearing any makeup at all. I used creams to contour and around the eyes to give her darkness which I think worked really well as, again, it looks very natural and realistic. The scabs on her skin are very prominent; however when I look back at my research images, there were very obvious so I am happy with how much focus they pull because they add character and show she is very run down. I added a lot of coconut oil in her hair and pulled some pieces forwards to make it look very thin and fragile and unhealthy so suit her depressed character. I think the oversized grey top works really well as it makes her look very grungy and messy and as if she dresses only for comfort and not to look attractive. I am really happy with how realistic the bite looks in these mid shot photos; the colours look very realistic and so does the sizing.

How to: Silicone Flat Moulds for my Assessment

Equipment:
-Sticks
-Gloves
-Glue gun
-Clay sculpture on some plastic
-Measuring cups
-Scissors
-Fixing spray
-Petrolease
-Silicone A
-Silicone B
-Scales
-Cling film
-Baby wipes
-Tissues
-Isopropyl alcohol
-Baldiez
-Hair dryer
-Brush
-Deadener
-Silicone pigments
-Metal plate
-Naphtha
-Baby buds

-Supra colour palette
-Foundation palette
-Fake blood and blood paste

Step by Step:

Wound Mould
1. Find a non-porous tray to build the silicone on to.
2. Sculpt the clay in the desired shape on the try, making sure to blend the edges well.
3. Spray the sculpture with fixing spray, making sure it is evenly covered from about 20cm away. Stand by a window and wear mask when doing this.
4. Let this spray dry.
5. Spray an even layer of Petrolease, from about 20cm away. Stand by an open window, wearing a mask wear doing this.
6. Create barrier around the clay sculpture with the clay so that the silicone I will pour over the sculpture doesn't run anywhere.
7. Cover work station and scale with cling film.
8. Mark your wooden sticks with A and B, depending on what sticks will be used for what silicone.
9. Put on gloves.
10. Measure out the exact amount of silicone A that you want with stick labelled A.
11. Change gloves.
12. Measure out the exact same amount of silicone B as you did A with stick labelled B, into the same measuring cup.
13. Clean both product containers with baby wipes and secure lids on tightly.
14. Mix the mixture of silicone well, to get rid of bubbles, and pour it over the clay sculpture, making sure the whole sculpture is covered.
15. Let this silicone dry completely for at least an hour.
16. Once the silicone is completely dry, remove it from the clay and wipe it down with alcohol with a tissue or cotton pad.
17. Spray the mould with Petrolease by an open window and wearing a mask, from about 20cm away.
18. Mix together a ratio of 1 Baldiez : 2 alcohol in a measuring cup.
19. Mix together well and avoid any air bubbles.
20. Apply two layers of this mixture to the mould using a brush, letting them dry in between. You can tell it is dry because it turns matte.
21. Mix together the exact same amount of silicone A and B and then add about 60% of the silicone mixture of Deadener. The more deadener that is added, the softer and more skin-like the silicone will look.
22. Add pigments to this mixture to match it to the model's skin.
23. Pour mixture into the mould to fill the mould and then scrape the excess off with a flat ruler. Do this in many directions to make it as flat and smooth as possible.
24. Let this set completely.

Application
25. Apply the Pros Aid to the wound and skin in an even layer with a cotton bud.
26. Wait until the glue goes clear on the wound and skin, and make sure the edges aren't peeled back.
27. Flip the wound onto the skin and pat it all down, avoiding any air bubbles. Press the wound onto the skin to make sure it has adhered properly.


28. Use a cotton bud and isopropyl alcohol to blend away the edges, making sue not to touch the latex.
29. I first added foundation over the mound to make it blend into the skin as much as possible.

30. I then added supra colour to the wound to give it some depth and to add realistic colour to the wound and around the wound to make it look like bruising.
31. I continued to play around with different colours until I thought it looked realistic enough. 

How to: Remove and Apply a Wound

Equipment:
-Talc
-Stiff brush
-Pros Aid
-Cotton buds
-Isopropyl alcohol

How to Remove a Wound from the Mould
1. Brush some talc all over the wound to make it not sticky.
2. Brush the talc under the latex with a stiff brush so that it starts to peel off. Gently pull back the latex to help it along, but be careful not to rip it!

How to Apply a Wound to Skin
1. Apply the Pros Aid to the wound and skin in an even layer with a cotton bud.
2. Wait until the glue goes clear on the wound and skin, and make sure the edges aren't peeled back.
3. Flip the wound onto the skin and pat it all down, avoiding any air bubbles. Press the wound onto the skin to make sure it has adhered properly.
4. Use a cotton bud and isopropyl alcohol to blend away the edges, making sue not to touch the latex.
5. Start colouring the wound with supra colour or any other products necessary.

Monday 19 October 2015

My Final Look: Step by Step

Equipment:
-Supra colour palette
-Bourjois bronzing mousse
-Spatulas
-Non-waterproof mascara
-Bowl of water
-Disposable mascara wands
-Liquid latex in bowl
-Tissue paper
-Kitchen towel
-Cotton buds
-Virgin coconut oil
-Thick hand band
-Egg whites
-Small fluffy brush
-Small angled brush
-Foundation palette
-Blood paste
-Grey jumper

Before makeup application.
Step by Step:
1. I first mixed together some brown bronzing mousse (the one from Bourjois) with some black and white supra colour. I thought that the brown colour was too warm on its own to I added the black and white to give it more of a grey tone.
2. I applied a tiny bit of this under my cheekbones to make it look like a natural shadow was falling underneath. I blended this out really well with my fingers to make it look as realistic as possible.
3. I then added some coming down from the contour to the outer sides of my chin to make me look more gaunt. I, again, blended this in very well so that it didn't look too obvious.
4. I then added some of the same grey toned brown at the sides of my temples to make my forehead look slimmer. I blended this into my hair line very well.
5. I then added some of this grey toned brown from the beginning of the eyebrow down the sides of the bridge of my nose to make it look smaller and to make my eyes look more sunken in.
6. I added a very small amount of this cream colour under my smile lines to make the skin look less plump and more like it was sagging down.

7. I added some of this same colour under my eyes, where the darkest part of my bags were and blended it in to make it look very natural. I also added this in my inner corners to make the eyes look very tired.
8. I added some of this into the sockets of my eyes to make my eyes look more tired and sunken in. I blended a very small amount of this on the eyelids to add to the overall dark effect.

9. I added a tiny bit of purple and a small bit of green under the eyes in the areas where these colours were naturally showing through. I will accentuate my model's natural shadows under her eyes so this colouring may vary slightly.
10. I added some red supra colour on the outer part of the lower lash line and blended it in very well to accentuate the red that was already there.

11. I applied a coat of non-waterproof mascara to the top and bottom eyelashes.
12. Apply some liquid latex to the area where you want the scab to be, with a spatular or cotton bud.
13. Rip some tissue in half and then take a small section of that half, screw it up, and press it into the liquid latex.
14. Apply one more coat of liquid latex over the top to seal down any edges and blend into the skin.

15. (Whilst the liquid latex is drying) I made sure I didn’t brush my hair before starting to style the hair. I warmed up some virgin coconut oil in my hands and brushed it through the roots of my hair with my fingers. I brushed it back far enough for it to look naturally greasy, but stopped just before the hair hit where the pony tail would be.
This is the virgin coconut oil I used.
16. I gathered my hair at the back of my head, in a low ponytail and secured it with a hand band. 
17. I then loosened the hair band slightly and pulled some hairs out. I didn’t want it to look too neat or precise so I just tugged at my hair and let bit fall out naturally. 
18. I pulled out some strands at the front of the hair to give a messier look.  

19. I made my finger slightly wet and then rubbed the mascara on my eyes until I felt it all start to smudge everywhere.
20. I roughly cleaned up the edges with my fingers so that the smudged mascara was more concentrated around her eyes.

21. Once the liquid latex has fully dried, take some egg whites on a cotton bud and apply it on top of the liquid latex.
22. Once the egg whites have fully dried, scratch at the scab with your nails to loosen some of the egg whites and make it look flakey and rough.
23. Smudge some red supra colour around the edges with your finger and blend very well.
24. Mix some blue, purple, red and yellow supra colour together to make a red/brown colour and, using a small angled brush, apply this over all the white tissue showing.

25. Add some more red to this mixture and dab it onto the scab in random patches.
26. Take a tiny bit of black on your small angled brush and dab it into the crevices/dents in the scab to give it more dimension.
27. Add some light coloured foundation to the lips with a fluffy brush to mute the colour of the natural lips slightly.
28. Add some yellow into the red/brown mixture and dab some with the small angled brush on some of the high points of the scabs, again adding dimension.

29. Add some blood paste to one or two of the scabs with a cotton bud, to make it look like she has just picked at it and it is bleeding slightly.

30. I then put on the baggy grey top to complete the look. I decided on my character wearing this very baggy, light grey jumper because it looks very loose fitting and scruffy and I like that the material is so thin because it makes it look more like she is wasting away underneath.  


Final Look


Close-ups of the scabs:


I am so excited by how my whole look has come together! I really like that I didn't use any foundation because the skin looks so natural and imperfect. I really like how dark and sunken in the eyes look and how they make her look so tired. I am really pleased that I only used creams because I was able to blend the contours and under eye bags really easily and made them look natural. I like how I have used a grey toned contour because it doesn't look like I've purposefully applied bronzer, it just looks like shadows being cast on the face. I am really pleased with how the scabs came out because I think they look very realistic and I like the more subtle redness around them. I think it's effective how I have added blood paste to just one of the scabs because you can see the contrast between the dry and bloody ones and it is clear that the character still picks at them. I think the greasy hair looks very effective and makes her look very dirty and like she doesn't look after herself properly. I am also very happy with the baggy grey jumper because it looks very similar to one I saw on the documentary I watched so I know that it is realistic.

I am not sure how I am going to position my model in the final images yet, but I know that the human bite mark is going to be positioned on her upper, lower arm so that needs to be on show. I am very nervous about only learning how to remove my prosthetic from my mould on the day of my assessment, just incase it goes wrong, or I rip it, or I'm not happy with how it has come out. I always like to be very prepared for any of my assessments so this is making me more nervous as I was not able to practice this part. 

Completing the Final Look

Makeup - Final Makeup Chart
I decided to use Face Chart 2 because I thought that that added cracked lips looked too much with the scabs on the face as well. I decided to keep the smudges mascara around the eyes because it added to the darkness and messiness of the character and made it look like she has been crying and not looking after herself properly. All the reasoning behind my decision on choosing all the factors in this makeup look are on the blog post before called 'Designing my Face Charts'.

Hair Charts
My first hair chart idea shows my model with her hair completely down, in a rough middle parting. I decided to add a thick gel or oil through the hair to make it look very greasy and dirty. I think that this hairstyle would look very realistic as I don't think the inmates would have bothered styling their hair; however I think that they might find it annoying if it was down because it would get in their eyes and face. 
Chosen Hair Chart
I therefore decided to choose my second hair chart idea because the hair would still look very greasy with gel or oil put in her hair, but it would be loosely tied off her face in a low ponytail. When I watched the documentary on female prison inmates, the majority of them wore their hair like this, so I thought it would look very realistic. I don't want to make it look very neat because I don't think this inmate would take the time to touch up and redo her hair during the day and therefore it may get a bit messy.

Outfit
I decided that my prison character would wear an oversized, grey sweatshirt. I decided on grey because it is a very dull and lifeless colour, which could definitely describe my character's emotions; this is also the colour that the majority of the prison inmates wore in the documentary I watched so I thought it would look the most realistic. I like the top on the left because it would look baggy on my model; however the image shows the back of the sweatshirt as the front has an unsuitable pattern on it. This means that the top wouldn't hang right on my model and there would be the label on the back showing through. I therefore decided to use the top on the right because it is very oversized and baggy and it isn't as structured as the other top, giving it a much more relaxed and slouchy look.