Showing posts with label Technical File. Show all posts

Friday, 27 November 2015

Step by Step of Human Hybrid (Updated)

Before starting the application of my tentacle pieces I had to remake the two top ones because they weren't as long or as thin as I wanted them; I also made them come to more of a point to they looked more tapered. I carried out the procedures of shaping the clay into the shape I wanted, making a mould out of the clay sculptures and then creating the pieces from the mould. All the steps on how to do this are listed in a blog post previous to this one. 

 Equipment:
-tentacle pieces
-pros-aide
-cotton buds
-isopropyl alcohol
-Mac strobe cream
-supra colour palette
-extra white supra colour
-extra black supra colour
-baby oil
-silver shimmer spray
-liquid latex
-big stippling brush
-medium stippling brush
-flat brush
-dark grey eye shadow
-small angled brush
-paddle brush
-pin tail comb
-hair gel
-green leaf top
-shells
-cape 
-spatulas
-lip brush
-water in spray bottle
-bald cap
-scissors
-acetone
-spirit gum

Step by Step:
1. Clean the model's face with cleanser and toner, but don't as moisturiser; or at least don't apply moisturiser anywhere where you will be applying the bald cap.
2. Brush the hair very well so there are no knots and brush it backwards.
3. Use gel to scrape the hair back, using your fingers and a comb, to make it as flat to the head as possible. Don't use any hair grips or pins as they will show through the bald cap; only use gel.
4. Put a towel round the model's shoulders and spray the models hair with water.
5. Brush back the model's hair again, constantly adding more gel or water if needed, to make it completely flush and rounded and smooth against the scalp.
6. Once the hair has been smoothed backwards, split the hair into a middle parting at the back with a tail comb.
7. Take each side of the hair and wrap it to the opposite side and smooth it upwards and round, to keep the hair looking as round and true to the shape of the scalp as possible.
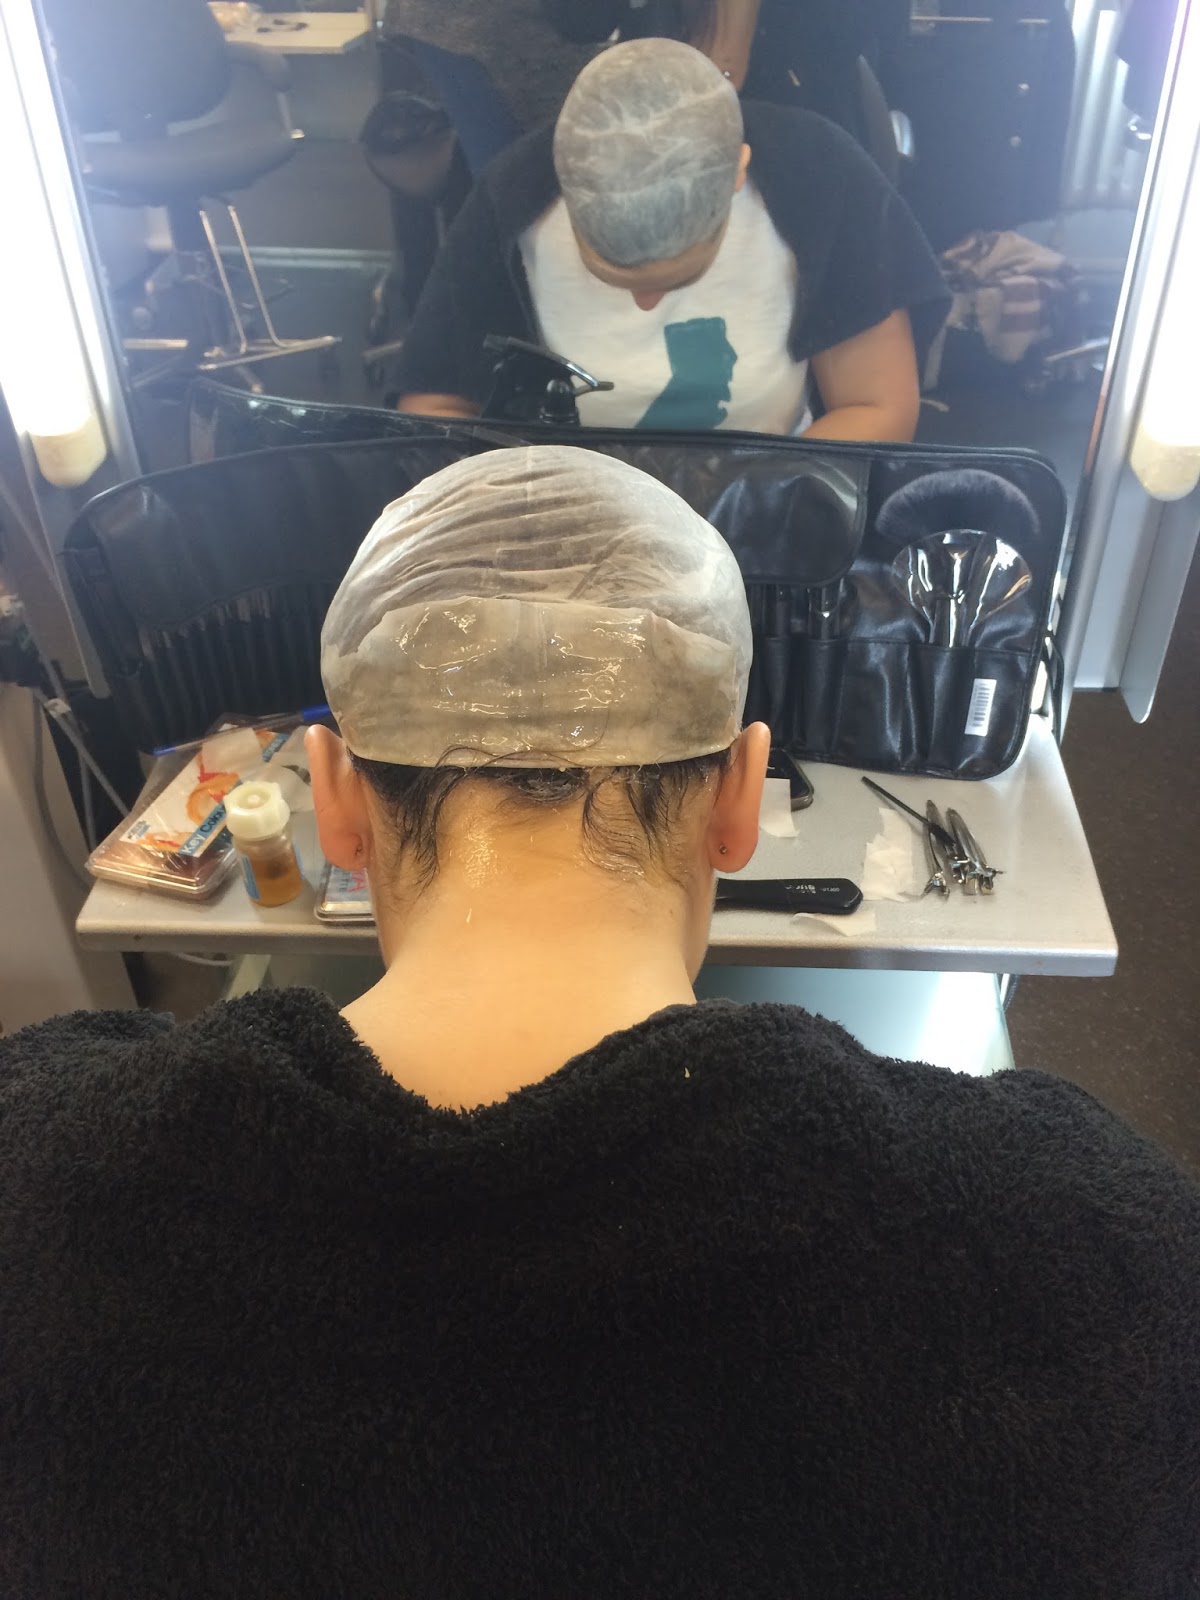
8. Ask the model to hold the front of the bald cap and then carefully pull the back over and to the bottom of the head, trying not to disturb the hair underneath. 
9. Push back the hair with a pin tail comb all the way round the neaten up the edges.
10. Cut a triangle around the ears so that the edges slot around the ears and so that no hair is showing.
11. Ask the model to lean her head forwards when doing the back so that there is enough bald cap to cover the hair when she leans forward and cut the bald cap so that when it's stretched down, it covers all the hair.
12. Cut all the way round the front of the bald cap, leaving enough material to pull over the hair.

13. Apply spirit gum onto the head and hair, where the bald cap will be secured, and also around the edges of the bald cap.
14. Wait for the spirit gum to get tacky and then smooth the bald cap down all the way around the head. The model's head needs to be leaning forwards when securing the back. 
15. Use a baby bud, with acetone, to smooth and blend the edges.
16. Apply pros-aide to the tentacles and the models skin where you want the tentacles to go. Wait for this to go clear, meaning it is ready for application.
17. Press the tentacles on the skin and smooth down the edges.
18. Use alcohol on a cotton bud to blend away and remove the edges. Make sure you don't remove too much near the silicone piece because this will create an edge. 
19. Apply white supra colour all over the bald cap to conceal some darkness before applying a grey colour all over.
20. Mix some black and white supra colour together, and add some baby oil, to make a light grey colour and then apply it to the face with a stippling brush to create an even coverage. Also apply this to the ears and down the neck. Blend this grey colour onto the bottom of the tentacles to blend them in to the face.   
21. Apply the same grey colour mixed with baby oil all over the bald cap and blend it into the face. 
22. I mixed together a grey colour that was slightly lighter than the face and applied it under the eyes, down the nose, on the chin, Cupid's bow and in the centre of the forehead. I used a flat brush to do this. I did this to give the face more dimension. 
23. I then mixed a slightly darker grey colour than the base and added this under the cheek bones and down each side of the nose to give more definition. I blended this out with a small stippling brush. 
24. I used a small flat brush and black supra colour to paint the two top tentacles and used a fluffy brush to blend out the edges.
25. I then used a colour that was similar to the contour colour on the bottom two tentacles and used a fluffy brush to blend them in.
26. I used a grey eye shadow and a small angled brush to very lightly fill in her eye brows.
27. I mixed a grey colour slightly darker than the base colour and applied it to the lips with a lip brush. I applied a slightly lighter colour in the centre to give the lips an ombre effect.
28. I mixed black and white supra colour to match the colour of the face, mixed it with baby oil, and applied it with a stipple brush all over the chest, neck and arms. 
29. I contoured the collar bones by adding a slightly lighter grey along the collar bones and a slightly darker grey in the hollows. 
30. I sprayed some silver shimmer spray all over her body and on her face and head to give a beautiful glossy sheen. 
31. I then secured the top on her.
32. I used liquid latex to stick the shells to the bald cap and her skin. I applied it to the shells and then pressed each shell into the position I wanted them. I positioned them randomly on the head leaving gaps, but keeping them in a rounded shell shape. I also scattered some on her chest and a couple down her face and neck. 
33. I finally poured some baby oil down her face and chest to give her a very wet and slimy finish.

Wednesday, 18 November 2015

Step by Step of my Human Hybrid

Equipment:
-tentacle pieces
-pros-aide
-cotton buds
-isopropyl alcohol
-Mac strobe cream
-supra colour palette
-extra white supra colour
-big stippling brush
-medium stippling brush
-flat brush
-dark grey eye shadow
-small angled brush
-mascara 
-black eye liner
-disposable mascara wands
-sponges
-paddle brush
-pin tail comb
-hair gel (for hair)
-green leaf top
-shampoo
-hair gel (for body)
-black food colouring 
-hand soap
-water
-bowl x2
-shells
-cape 

Step by step:
1. Clean skin completely, but don't moisturise.
2. Apply pros-aide to the tentacles and the models skin where you want the tentacles to go. Wait for this to go clear, meaning it is ready for application.
3. Press the tentacles on the skin and smooth down the edges.
4. Use alcohol on a cotton bud to blend away and remove the edges. Make sure you don't remove too much near the silicone piece because this will create an edge. 
5. Apply some Mac strobe cream all over the face, making sure to avoid the tentacles.
6. Mix some black and white supra colour together to make a light grey colour and then apply it to the face with a stippling brush to create an even coverage. Also apply this to the ears and down the neck.
7. Blend this grey colour onto the bottom of the tentacles to blend them in to the face. 
8. I mixed together a grey colour that was slightly lighter than the face and applied it under the eyes, down the nose, on the chin, Cupid's bow and in the centre of the forehead. I used a flat brush to do this.
9. I then mixed a slightly darker grey colour than the base and added this under the cheek bones and around the forehead to give some definition. I blended this out with a stippling brush.
10. I made a very dark grey colour with supra colour and applied this over the top two tentacles and blended the edges out into the base colour. 
11. I made this colour slightly lighter and applied it to the bottom two tentacles and blended it out to the base colour.
12. I filled in the model's eyebrows lightly with a dark grey eyeshadow and an angled brush.
13. I applied a light coat of mascara to my model's top and bottom eye lashes.
14. I then added some back eyeliner to her water line. 
15. I mixed a grey colour, roughly the same colour as the lower tentacles and outlined the lips with a small angled brush. I filled then in slightly to start the ombré lip.
16. I then made a grey colour roughly the same colour as the highlighted areas and put this in the middle of the lips. I blended this out to create an ombré lip. 
17. I brushed the hair back off her face and down her back and then smoothed it all down with lots of hair gel.
18. I coloured the body with grey supra colour to match the colour of her face.
19. I contoured the collar bones slightly with a lighter colour on the high points and a darker colour on the hollows. 
20. I then put the green top on her and tied it securely at the back. 
21. I placed pieces of shell all over her head with hair gel in clumps, but making it look random. 
(In studio)
22. I mixed some black food colouring with shampoo and poured it down my model's chest and neck.
23. I then mixed black food colouring and hair gel and added it on top of the shampoo mixture to give it more texture.
24. I finally mixed a bowl of water and hand soap to make bubbles and pressed it into the lips and down the neck. 

Thursday, 29 October 2015

How to: Apply a Bald Cap

Equipment:
-Cleanser
-Toner
-Hair brush
-Tail comb
-Water in spray bottle
-Hair gel
-Soap
-Bald cap
-Scissors
-Soft pencil
-Spirit gum
-Cotton buds
-Acetone
-Supra colour palette
-Sponge

Step by Step:
1. Clean the model's face with cleanser and toner, but don't as moisturiser; or at least don't apply moisturiser anywhere where you will be applying the bald cap.
2. Brush the hair very well so there are no knots and brush it backwards.
3. Use gel to scrape the hair back, using your fingers and a comb, to make it as flat to the head as possible. Don't use any hair grips or pins as they will show through the bald cap; only use gel.
4. If the model has fine baby hairs, then soap can be used to scrape back and flatten them for a neat look.
5. Put a towel round the model's shoulders and spray the models hair with water.
6. Brush back the model's hair again, constantly adding more gel or water if needed, to make it completely flush and rounded and smooth against the scalp.
7. Once the hair has been smoothed backwards, split the hair into a middle parting with a tail comb.
8. Take each side of the hair and wrap it to the opposite side and smooth it upwards and round, to keep the hair looking as round and true to the shape of the scalp as possible.
9. Ask the model to hold the front of the bald cap and then carefully pull the back over and to the bottom of the head, trying not to disturb the hair underneath. You can ask another person to hold the top of the hair to keep it in place while you pull the bald cap back.
10. Push back the hair with a pin tail comb all the way round the neaten up the edges.
11. Cut a triangle around the ears so that the edges slot around the ears and so that no hair is showing.
12. Use a soft pencil to draw an outline around the edges of the hair, making sure to leave a bit extra because you want no hair showing at all. Ask the model to lean her head forwards when doing the back so that there is enough bald cap to cover the hair when she leans forward.
13. Cut all the way round the bald cap, following the guide lines.
14. Apply spirit gum onto the head and hair, where the bald cap will be secured, and also around the edges of the bald cap.

15. Wait for the spirit gum to get tacky and then smooth the bald cap down all the way around the head. The model's head needs to be leaning forwards when securing the back.


16. Use a baby bud, with acetone, to smooth and blend the edges.
17. Dab some pink/red supra colour all over the areas with dark hair to colour correct them so that, when skin colour is added on top, it blends in with the natural skin seamlessly.


Notes to Remember
-Do not cut the bald cap before application as it may not fit properly.
-Only buy matte spirit gum so that it doesn't look shiny and obvious in studio lighting.
-You can't put bald caps on people with weaves.
-Work the gel through the roots to make it all smooth down more easily.
-You can ask another person to hold the top of the hair to keep it in place while you pull the bald cap back.
-Model needs to keep her eyes firmly shut when using the acetone on the forehead to avoid it getting in her eyes.

How to: Silicone Flat Moulds for my Assessment

Equipment:
-Sticks
-Gloves
-Glue gun
-Clay sculpture on some plastic
-Measuring cups
-Scissors
-Fixing spray
-Petrolease
-Silicone A
-Silicone B
-Scales
-Cling film
-Baby wipes
-Tissues
-Isopropyl alcohol
-Baldiez
-Hair dryer
-Brush
-Deadener
-Silicone pigments
-Metal plate
-Naphtha
-Baby buds

-Supra colour palette
-Foundation palette
-Fake blood and blood paste

Step by Step:

Wound Mould
1. Find a non-porous tray to build the silicone on to.
2. Sculpt the clay in the desired shape on the try, making sure to blend the edges well.
3. Spray the sculpture with fixing spray, making sure it is evenly covered from about 20cm away. Stand by a window and wear mask when doing this.
4. Let this spray dry.
5. Spray an even layer of Petrolease, from about 20cm away. Stand by an open window, wearing a mask wear doing this.
6. Create barrier around the clay sculpture with the clay so that the silicone I will pour over the sculpture doesn't run anywhere.
7. Cover work station and scale with cling film.
8. Mark your wooden sticks with A and B, depending on what sticks will be used for what silicone.
9. Put on gloves.
10. Measure out the exact amount of silicone A that you want with stick labelled A.
11. Change gloves.
12. Measure out the exact same amount of silicone B as you did A with stick labelled B, into the same measuring cup.
13. Clean both product containers with baby wipes and secure lids on tightly.
14. Mix the mixture of silicone well, to get rid of bubbles, and pour it over the clay sculpture, making sure the whole sculpture is covered.
15. Let this silicone dry completely for at least an hour.
16. Once the silicone is completely dry, remove it from the clay and wipe it down with alcohol with a tissue or cotton pad.
17. Spray the mould with Petrolease by an open window and wearing a mask, from about 20cm away.
18. Mix together a ratio of 1 Baldiez : 2 alcohol in a measuring cup.
19. Mix together well and avoid any air bubbles.
20. Apply two layers of this mixture to the mould using a brush, letting them dry in between. You can tell it is dry because it turns matte.
21. Mix together the exact same amount of silicone A and B and then add about 60% of the silicone mixture of Deadener. The more deadener that is added, the softer and more skin-like the silicone will look.
22. Add pigments to this mixture to match it to the model's skin.
23. Pour mixture into the mould to fill the mould and then scrape the excess off with a flat ruler. Do this in many directions to make it as flat and smooth as possible.
24. Let this set completely.

Application
25. Apply the Pros Aid to the wound and skin in an even layer with a cotton bud.
26. Wait until the glue goes clear on the wound and skin, and make sure the edges aren't peeled back.
27. Flip the wound onto the skin and pat it all down, avoiding any air bubbles. Press the wound onto the skin to make sure it has adhered properly.


28. Use a cotton bud and isopropyl alcohol to blend away the edges, making sue not to touch the latex.
29. I first added foundation over the mound to make it blend into the skin as much as possible.

30. I then added supra colour to the wound to give it some depth and to add realistic colour to the wound and around the wound to make it look like bruising.
31. I continued to play around with different colours until I thought it looked realistic enough. 

How to: Remove and Apply a Wound

Equipment:
-Talc
-Stiff brush
-Pros Aid
-Cotton buds
-Isopropyl alcohol

How to Remove a Wound from the Mould
1. Brush some talc all over the wound to make it not sticky.
2. Brush the talc under the latex with a stiff brush so that it starts to peel off. Gently pull back the latex to help it along, but be careful not to rip it!

How to Apply a Wound to Skin
1. Apply the Pros Aid to the wound and skin in an even layer with a cotton bud.
2. Wait until the glue goes clear on the wound and skin, and make sure the edges aren't peeled back.
3. Flip the wound onto the skin and pat it all down, avoiding any air bubbles. Press the wound onto the skin to make sure it has adhered properly.
4. Use a cotton bud and isopropyl alcohol to blend away the edges, making sue not to touch the latex.
5. Start colouring the wound with supra colour or any other products necessary.

Monday, 12 October 2015

How to: Create a Mould

Equipment:
-Sticks
-Gloves
-Glue gun
-Clay sculpture on some plastic
-Measuring cups
-Scissors
-Fixing spray
-Petrolease
-Silicone A
-Silicone B
-Scales
-Cling film
-Baby wipes
-Tissues
-Isopropyl alcohol
-Baldiez
-Hair dryer
-Brush
-Deadener
-Silicone pigments
-Metal plate
-Naphtha
-Baby buds

Preparation:
-Label sticks A and B.
-Apply cling film over working surface and scales.
-Apply gloves
-Put the glue gun on so that it can be heating up ready for use later on. Make sure it is leaning on an appropriate surface.
-Clay should already be in a bite shape ready for moulding.


Step by step:
1. Cut the top of the cup off, about 1/3 of the way down.
2. Shake the fixing spray well, go over to an open window, and spray the clay evenly from about 20cm away.
3. Once the fixing spray has dried, spray the clay evenly with some Petrolease, from about 20cm away, again.
4. Place the cup around the wound and use the glue gun to secure the cup to the plastic so that no silicone with leak out. Press down on the cup whilst the glue is drying so that it lies flat. Leave the glue to dry and harden.
5. Put a new cup on the scales and put the scales to 0.
6. Put on some new gloves and take a stick labelled A and scoop out some of the silicone A and put it in the cup until it reaches 30 grams.
7. After the 30 grams has been added to the cup, clean the outside of the pot with silicone A in it with baby wipes and put the lid tightly on.
8. Put some new gloves on and use a stick labelled B with the silicone B and scoop 30 grams of product into the cut with A in it.
9. Clean the outside of the pot of B with some baby wipes and secure the lid.
10. With the same B stick mix the products together well and try to get as little bubbles as possible. If bubbles occur, then tap the cup on the table and they should rise to the surface and disappear.
11. Pour the silicone mixture over your wound so that the silicone completely covers the wound. Do this in back and forth motions to give an even coverage.
12. Let the silicone set for about an hour or until it hardens.
13. Once the mould has set, cut around the glue and pull out the hardened silicone.
14. Wipe the silicone with some tissue and isopropyl alcohol; use baby pubs if necessary.
15. Spray the moulded silicon with Petrolease evenly, from a 20cm distance and let it dry.
16. Create a mixture of 1 part baldiez and 2 part isopropyl alcohol and mix together well.
17. Pour some of this mixture into the dents in your silicone and smooth it away with a brush to blend the edges and coat the wound.
18. Apply a second coat all over the wound and let it dry, You can use a cool hair dryer to speed up this process.
19. Apply some gloves and add 8 grams of silicone A into a clean cup with a stick labelled A.
20. Wipe the pot down with a baby wipe before securely tightening the lid.
21. Apply some new gloves and add 8 grams of silicone B with a stick labelled B.
22. Wipe the pot down with a baby wipe before securely tightening the lid.
23. Using a new stick and some new gloves, add 12 grams of deadener to the mixture to make the silicone softer and more skin-like.
24. Add some drops of pigment to your mixture to make it closer to your model's skin colour.
25. Pour the mixture into the mould to fill the teeth markings.
26. Sweep something flat, I used the metal plate from my kit, across your wound to get rid of any excess mixture and make the product flat with the mould.
27. Put some Naphtha on a baby bud, wipe off the excess, and blend out the edges so that they won't look so harsh on the skin.

I really enjoyed making these wound moulds because it is very mathematical, with all the numbers and measuring, which reminds me of being back in school with my maths and science lessons, which I loved. I had never used many of the products before this lesson so I found it fun introducing myself and experimenting with many new products and mixtures. I found it difficult to take the silicone out of the plastic cup and unfortunately I ripped my first silicone mould, as you can see above. This made me take a lot more care in removing my silicone moulds next time and it also taught me to always check that the silicone is definitely solid enough to some out of the cup. I also noticed that the silicone had quite a few bubbles in it so I made sure that I spent extra time trying to remove the bubbles when I did it again.
When I redid the moulds I decided to do them both at once to be time efficient. Below are my two final outcomes. I am slightly concerned that the detailing in the bottom of the teeth marks aren't going to show up because they don't seem to be covered in the silicone mixture. I will be really disappointed if this is the case and I will have to work really hard when colouring it, to make it look as realistic as possible.
My assessment for these wounds is next week and we are only being taught how to get this pieces out of the mould on the same day so I am concerned that I am not going to have a chance to practice the painting of the wound and I am worried that they won't come out as I wanted and I won't have any time to redo them.