Sunday, 18 October 2015

Experimenting with the Makeup Look

I first decided to do my practice face chart 1 on my face to see how it turned out. I didn't apply any foundation or even moisturiser as I wanted the makeup to look as natural as possible.

Step by step:
1. I first mixed together some brown bronzing mousse (the one from Bourjois) with some black and white supra colour. I thought that the brown colour was too warm on its own to I added the black and white to give it more of a grey tone.
2. I applied a tiny bit of this under my cheekbones to make it look like a natural shadow was falling underneath. I blended this out really well with my fingers to make it look as realistic as possible.
3. I then added some coming down from the contour to the outer sides of my chin to make me look more gaunt. I, again, blended this in very well so that it didn't look too obvious.
4. I then added some of the same grey toned brown at the sides of my temples to make my forehead look slimmer. I blended this into my hair line very well.
5. I then added some of this grey toned brown from the beginning of the eyebrow down the sides of the bridge of my nose to make it look smaller and to make my eyes look more sunken in.
6. I added a very small amount of this cream colour under my smile lines to make the skin look less plump and more like it was sagging down.
7. I added some of this same colour under my eyes, where the darkest part of my bags were and blended it in to make it look very natural. I also added this in my inner corners to make the eyes look very tired.
8. I added some of this into the sockets of my eyes to make my eyes look more tired and sunken in. I blended a very small amount of this on the eyelids to add to the overall dark effect.
9. I added a tiny bit of purple and a small bit of green under the eyes in the areas where these colours were naturally showing through. I will accentuate my model's natural shadows under her eyes so this colouring may vary slightly.


Before - side on.
10. I added some red supra colour on the outer part of the lower lash line and blended it in very well to accentuate the red that was already there.
Before - front on.

After - side on.

After - front on.

I love how natural the makeup looks and how the subtle changes have made such a difference in how ill and tired she the model looks. I really like how the grey toned contour look like natural shadows being cast on the face. I am happy with the blending of the contours because they look very natural. I could possibly go slightly heavier under the eyes to make her look even more tired and worn out because some of the colouring was bleached out by the bright natural light I was using. I might want to accenturate the redness around her nose to make her look even more run down. In my next practice I am going to add some skin coloured foundation over the lips slightly because all the examples I showed of people who have been addicted to heroine had very pale lips; it will also add to the sickly look I am going for.

Possible added Mascara
I then looked at face chart 2, where it looks like the inmate has worn mascara a couple days ago but hasn't bothered to remove it so there is still smudged and flaked off mascara round her eyes. I had a go at this and I like how it turned out. It added general darkness to the eyes, and made them look more tired. I like what this aspect of the makeup would add to the character too. It would give the impression that she is lazy, doesn't look after herself well and doesn't really care what she looks like. I think I will add this aspect in to my character's look in my next practise and see how it turns out.
Before mascara.
After - smudged mascara
Cracked lips
I also tried out the cracked lips look from face chart 3 and I am really happy with how they came out! I first applied some light coloured foundation all over the lips to mute out the natural lip colour. I then added strips of duo eyelash glue to the areas on the lips that I want it to have split. I added a bigger section of duo lash glue on the corner of the mouth. Once the glue had dried completely, I started to pick at the glue to split it and make it look like the skin was splitting. Once I was happy with all the split/cracked marks, I added some red supra colour on the inside to make it look really sore and raw. I am really happy with how realistic it looks; however I think it might be too much for this one character. I am planning on including the smudged mascara aspect so I think if I also add the cracked lips, as well as the scabs all over the face, it might look too over done and over the top.


Creating the Scabs
Below is a close-up image of a real scab. Someone had cut their knee and it is now healing and scabbing over. The scab looks very rough and slightly risen. The outside of the scab has the same texture as the skin, but it is slightly red/pink. The scab itself has many colours; it is predominantly a very dark red/brown and then their are yellows, brighter reds and greens blended in as well.
WISCONSINART, 2015. Stock Photo: Knee Scrape, Scab, Scar, Injury Close-up Detail [18 October 2015]. Available from: http://thumbs.dreamstime.com/z/knee-scrape-scab-scar-injury-closeup-detail-24314710.jpg

Attempt 1
When it came to creating the scabs on the face, I had a couple of ideas and so I wanted to test all of them out. I knew I wanted to text out using liquid latex with tissue underneath to give it texture and height. I also knew I wanted to test out using flour and water to create a cracked effect. I then thought of using eyelash glue and also an egg white. Below are images of the different substances on the face and what I think of them.

-The one at the top is a mixture of flour and water. I like how it cracks to form sharp and defined edges and it is easily achieved. However I think that the cracks are too big and that the skin would be more flakey on a scab instead of harsh cracks.
-The second one down is egg whites. I like how it goes on almost colourless because I would be able to add colour to it underneath and it would still show through. I also like how when it dries it becomes very rough, with tiny cracks in it. However I don't think this product would give enough height, even if many layers were added.
-The one at the bottom, on the left, is the liquid latex. I applied some liquid latex straight onto the skin, then added some scrunched up tissue and then covered the tissue with more liquid latex to give it that height and texture. I really like how much volume you can get from using this technique and how you can manipulate the shape of the scab easily; however I don't like the finishing texture because it is too smooth.
-The one on the bottom, right, is the duo lash glue. I let the glue dry and then rubbed it and pinched it until it created a texturised lump. I wasn't a fan of this method because it didn't create a rough texture and it didn't add much volume.

Attempt 2
As I wasn't completely happy with any of these techniques, I decided to combine some of them together. I decided to try to use the tissue and liquid latex to create the overall shape and volume and then, once that was dry, I would add some egg whites on top to create the rough skin. Below was the outcome of this.

Step by step:
1. Apply some liquid latex to the area where you want the scab to be, with a spatular or cotton bud.
2. Rip some tissue in half and then take a small section of that half, screw it up, and press it into the liquid latex.
3. Apply one more coat of liquid latex over the top to seal down any edges and blend into the skin.
4. Once this has fully dried, take some egg whites on a cotton bud and apply it on top of the liquid latex.
5. Once the egg whites have fully dried, scratch at the scab with your nails to loosen some of the egg whites and make it look flakey and rough.
6. Smudge some red supra colour around the edges with your finger and blend very well.
7. Mix some blue, purple, red and yellow supra colour together to make a red/brown colour and, using a small angled brush, apply this over all the white tissue showing.
8. Add some more red to this mixture and dab it onto the scab in random patches.
9. Take a tiny bit of black on your small angled brush and dab it into the crevices/dents in the scab to give it more dimension. 
10. Take a small flat brush and dab a small amount of red round the edges of the scabs and blend the edges well.
11. Add some yellow into the red/brown mixture and dab some with the small angled brush on some of the high points of the scabs, again adding dimension. 
12. Blend edges further and mute the red slightly with a small flat brush and some light coloured foundation.
13. Add some blood paste to one or two of the scabs with a cotton bud, to make it look like she has just picked at it and it is bleeding slightly.

I am really happy with how the scabs finally came out. I had the image of the scab, above, in front of me the whole time I was doing it so I could make the colours as realistic as possible. I am really happy with the colouring and the texture of the scabs; however I think they look slightly too big for the face, so I will try to make them smaller next time I practice. I also think they could be improved by blending the edges of the latex a bit more smoothly; I don't like how you can see the outline of where the liquid latex stops, so I will go around the latex with a cotton bud and soapy water if the edges are particularly obvious to smooth them down. I will do this before colour application.

Designing my Face Charts

After researching the effects that Heroine has on the body and the users appearance, I decided to create three face charts, all with slightly different added aspects. I have explained the reasoning behind my ideas below. Just below is the model I will be using in my assessment. She has naturally quite clear skin, however I don't want to cover up her freckles or other imperfections. I don't want to loose the natural texture of the skin so I think I will just use creams and supra colour in my design. My model wears fake tan on a regular basis, so her body is a lot darker than her face. I'm not sure whether I'm going to incorporate this aspect into my character or wether I'm going to try and match her body skin colour to her paler face using foundations. This may cause the body to have a different texture to the face which I don't think will look very natural. 
My model with no makeup on.

Face Chart 1
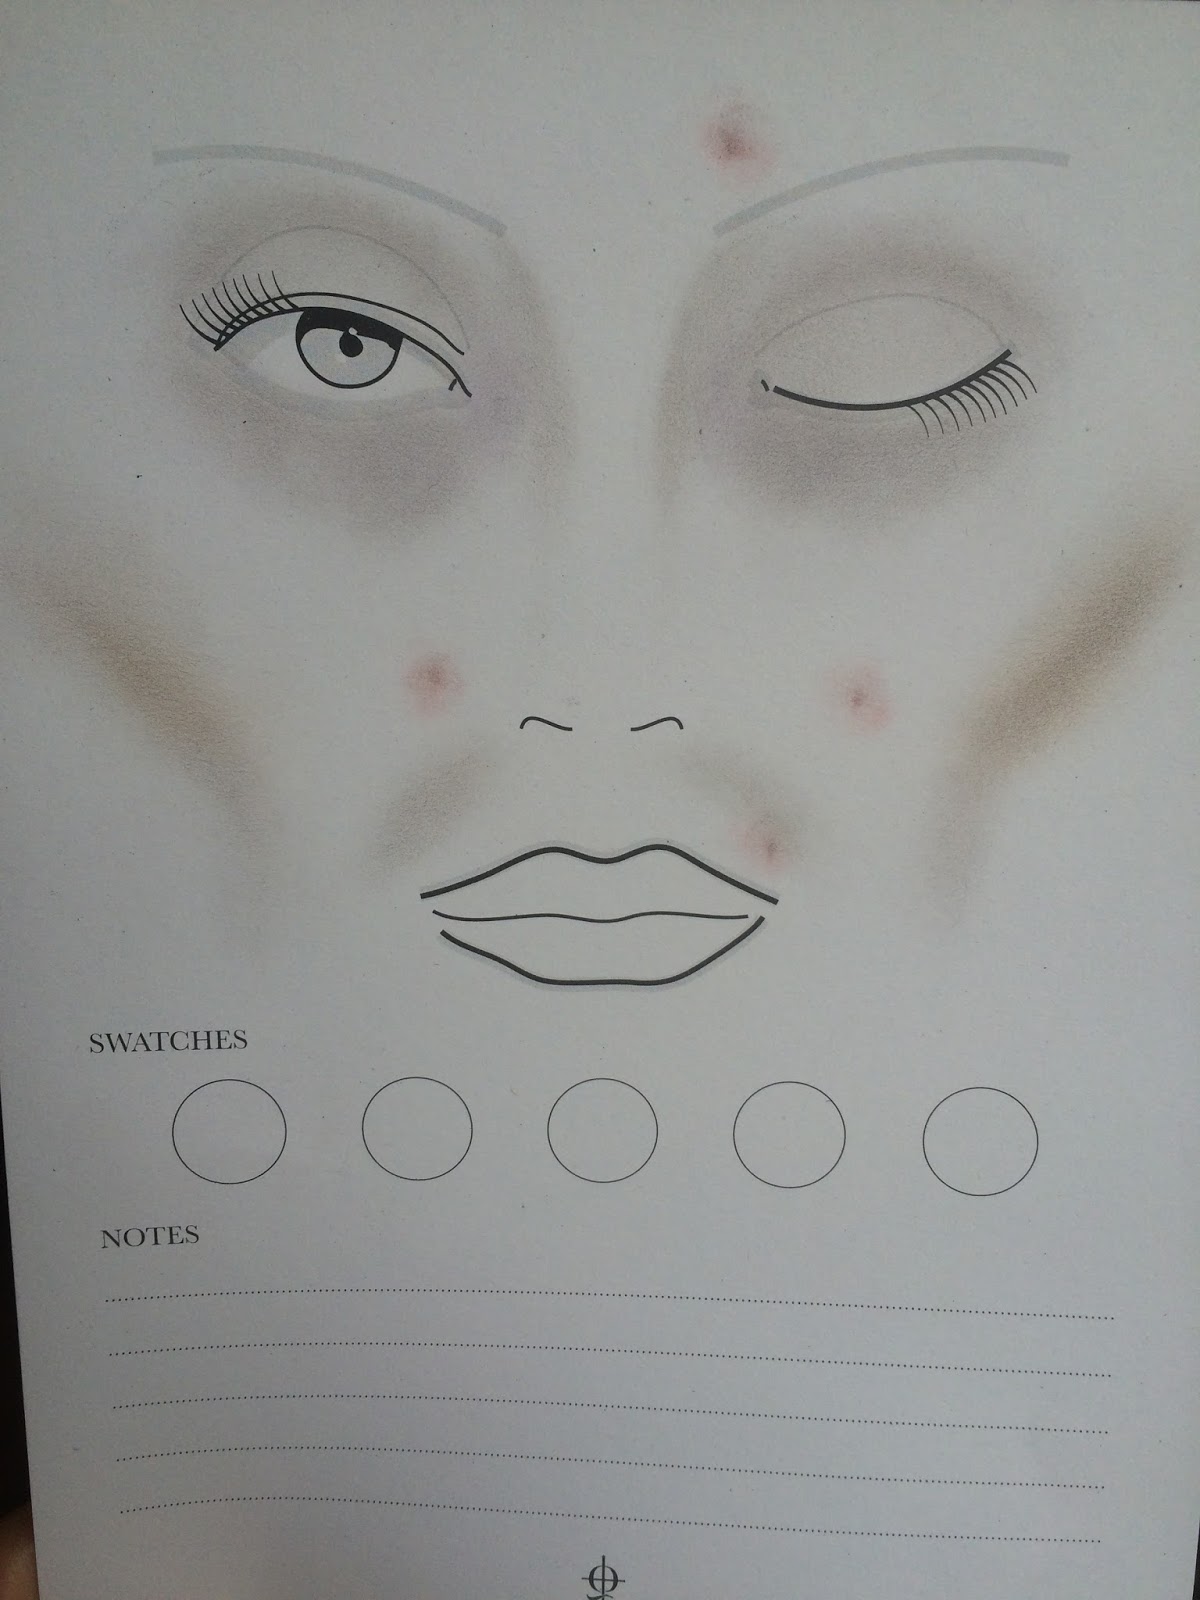
I decided not to put any foundation on my model's face as I wanted her natural imperfections to show and I wanted to show her natural skin texture and finish. I contemplated applying a light coloured foundation all over her face and any body parts showing, however this would cover my model's natural imperfections and make her skin look slightly fake and as if she's wearing make-up. I want her make her face look thinner than it actually is and I will do that with contouring. I have decided to use a grey toned colour for the contour to make it look more like the natural shadows that would be cast underneath her cheekbones. Using a grey toned contour will also mean that no warmth is added to the face. In this face chart I have contoured the top of the nose and round the eye socket slightly to make her eyes look more sunken in. I have also contoured underneath her cheekbones, blending the colour downwards. I have brought the contour down besides the mouth as this will make her cheekbones look more sunken in and her face look more gaunt. I contoured underneath her smile lines slightly to make it look like her face is sagging down slightly and therefore making her look older and more tired looking. I want all the contouring to look as natural as possible, so I have decided to experiment with using creams to do this; however if this does not work how I want it to then I will use eyeshadows to create these contours. I want to accentuate the natural darkness around my model's eyes to make them look more sunken in and tired; however I focused on making them look more grey than they look naturally. I will use my supra colour palette to do this so that the finish is more natural looking. I am also going to put a grey colour into her eye sockets to make them look more deep set, again making her look more ill and tired. I have decided not to fill in my model's eyebrows because I don't think her character would have the patience or motivation to fill in her eyebrows. I have added some red scabs around her face because this is the main feature of heroine addicts that stood out to me. I will experiment with using different materials until I am happy with the outcome. I want them to look very flakey and sore, so I think I will use liquid latex and supra colour to achieve this.

Face Chart 2
I decided not to put any foundation on my model's face as I wanted her natural imperfections to show and I wanted to show her natural skin texture and finish. I contemplated applying a light coloured foundation all over her face and any body parts showing, however this would cover my model's natural imperfections and make her skin look slightly fake and as if she's wearing make-up. I want her make her face look thinner than it actually is and I will do that with contouring. I have decided to use a grey toned colour for the contour to make it look more like the natural shadows that would be cast underneath her cheekbones; using a grey toned contour will also mean that no warmth is added to the face. In this face chart I have contoured the top of the nose and round the eye socket slightly to make her eyes look more sunken in. I have also contoured underneath her cheekbones, blending the colour downwards. I have brought the contour down besides the mouth as this will make her cheekbones look more sunken in and her face look more gaunt. I want all the contouring to look as natural as possible, so I have decided to experiment with using creams to do this; however if this does not work how I want it to then I will use eyeshadows to create these contours. I want to accentuate the natural darkness around my model's eyes to make them look more sunken in and tired. I added more purple colouring in this face chart around the eyes to reflect the natural colouring more accurately. I will use my supra colour palette to do this so that the finish is more natural looking. I am also going to put a grey colour into her eye sockets to make them look more deep set, again making her look more ill and tired. I have decided not to fill in my model's eyebrows because I don't think her character would have the patience or motivation to fill in her eyebrows. I have added some red scabs around her face because this is the main feature of heroine addicts that stood out to me. I will experiment with using different materials until I am happy with the outcome. I want them to look very flakey and sore, so I think I will use liquid latex and supra colour to achieve this. I decided to add some flaking mascara around the eyes in this face chart to make it look like she maybe applied some mascara a few days ago and just hasn't bothered to take it off. This will add to the darkness of her eyes and add to her lazy and deteriorating character.

Face Chart 3
I decided to apply a very thin layer of foundation all over her face because then I could make sure that the face colouring and texture would match her body parts shown. If I were to do this, then I would use my fingers to apply and press in the foundation to make it look more skin-like and natural, as I don't want it to look like my character is wearing lots of makeup. I would not use a warm toned foundation when doing this as I want my character to look sickly and pale. I will powder the foundation when it is completed and then try using powder contours on top to see if it looks more natural then if I were to use creams. I want her make her face look thinner than it actually is and I will do that with contouring. I have decided to use a grey toned colour for the contour to make it look more like the natural shadows that would be cast underneath her cheekbones; using a grey toned contour will also mean that no warmth is added to the face. In this face chart I have contoured the top of the nose and round the eye socket slightly to make her eyes look more sunken in. I have also contoured underneath her cheekbones, blending the colour downwards. I want to accentuate the natural darkness around my model's eyes to make them look more sunken in and tired. I will use my supra colour palette to do this so that the finish is more natural looking, however I will go over this with translucent powder to tie it the same finish as the rest of the face. I am also going to put a grey colour into her eye sockets to make them look more deep set, again making her look more ill and tired. I have decided not to fill in my model's eyebrows because I don't think her character would have the patience or motivation to fill in her eyebrows. I have added some red scabs around her face because this is the main feature of heroine addicts that stood out to me. I will experiment with using different materials until I am happy with the outcome. I want them to look very flakey and sore, so I think I will use liquid latex and supra colour to achieve this. In this face chart I added in the appearance of flakey lips because it says that when you take heroine your mouth gets dry, which could lead to the user licking their lips and therefore making them dry. This could have continued after being in prison and therefore her lips will be painful looking and cracking.

I will experiment with different factors from each face chart on myself so that I can see what I find more effective and more realistic looking. I will then create my final face chart with my final decision on it.

Heroine and its Effects

What is Heroine?
Heroine is a drug made from morphine, that is extracted from the opium poppy. It can either be smoked, injected or snorted, if it's pure. Opium has was originally used as a strong painkiller, however when it is turned into heroine it is made much stronger then opium or morphine. Some people use this drug to make them calm down and relax as if it is taken in small doses it can make you feel comforted, happy and give you a 'rush' of pleasure, and then if you take a bigger dosage it can make you feel sleepy and relaxed. The drug can cause a hot flush to the skin and the mouth to get very dry. After the initial 'rush' the user will become very drowsy and their bodily functions will slow down, including the breathing and heart rate.
If the heroine is pure, it is a white powder; however the substance is often mixed with other substances when on the streets so can range from a whitish brown to brown in colour. It is a highly addictive and is a class A illegal drug. If you have own the drug, it could give you up to 7 years in prison or an unlimited fine. If you supply this drug to anyone else then it can get you a life sentence in prison. If you are caught with the drug, it will also have a big impact on your future, for example, you will be banned from certain countries and you won't be allowed to do certain jobs.
Heroine.
LINDLEY, R., 2015. Issues and Ales: Heroin in Alabama [18 October 2015]
Available from: https://news.wbhm.org/feature/2015/issues-and-ales-heroin-in-alabama/
Effects of Heroine
There are many risks with taking heroine. If you take an overdose of the drug, you can be put in a coma or even die, as your respiratory system will fail. An overdose can happen if you have been taking heroine for a long time and built up some tolerance to a certain dose, because if you then don't take it for a few days and then go straight back to this high dosage, you body won't be able to cope. If you mix heroine with other drugs or alcohol then an overdose is also likely. You can choke on your own vomit when taking heroine as it can numb you, make you very relaxed and stops you coughing properly, meaning the vomit can stay in your airways causing you not to be able to breath. If the users breathing slows down too much then that can result in a coma or permanent brain damage. If you inject heroine it can damage your veins and arteries and lead to infection. If you share the needle with others then you can spread infections such as HIV/Aids.

The physical effects of the users appearance can cause weight lose, abscesses(boils), cellulite and scabs on the skin from picking and it can cause loss of teeth. I will need to keep these factors in mind when designing my character's makeup. Some example of before and after drug use are shown below. 

The weight loss causes the cheekbones to become more prominent and the eyes to look more sunken in. The weightless can also cause sagging skin and wrinkles. In all of the images below, the eyes are a feature that I think have made one of the biggest difference; they look very sunken in and dark with very prominent under eye bags. The other major difference are the scabs all over the face. This is from when the user has continuously picked at their skin, either at their abscesses or other acne on their face from bad health. A reason why they could look so awful and run down is because, once they have become addicted, their main goal in life is to find where they're going to get their next 'fix' from, meaning that they would rather spend money on that than keeping their bodies healthy and their appearance looking well put together. 

SHARESLOTH, 2014. Shocking Before and After Meth Photos.
In: 
Sharesloth. 8 May 2014 [18 October 2015]. Available from: http://sharesloth.com/shocking-meth-photos/

SHARESLOTH, 2014. Shocking Before and After Meth Photos. 
In: Sharesloth. 8 May 2014 [18 October 2015]. Available from: http://sharesloth.com/shocking-meth-photos/
SHARESLOTH, 2014. Shocking Before and After Meth Photos. 
In: Sharesloth. 8 May 2014 [18 October 2015]. Available from: http://sharesloth.com/shocking-meth-photos/

Resources:
FRANK, 2011. Heroin [10 October 2015]. Available from: http://www.talktofrank.com/drug/heroin

NATIONAL INSTITUTE ON DRUG ABUSE, 2014. What is Heroin and How is it Used? [18 October 2015]. Available from: https://www.drugabuse.gov/publications/research-reports/heroin/what-heroin

STAMPLER, L., 2012. This New 'Faces of Meth' Ad Is Utterly Harrowing. In: Business Insider. 3 December 2012 [18 October 2015]. Available from: http://www.businessinsider.com/new-faces-of-meth-ads-are-utterly-harrowing-2012-12?IR=T

LINDLEY, R., 2015. Issues and Ales: Heroin in Alabama [18 October 2015]. Available from: https://news.wbhm.org/feature/2015/issues-and-ales-heroin-in-alabama/

SHARESLOTH, 2014. Shocking Before and After Meth Photos. In: Sharesloth. 8 May 2014 [18 October 2015]. Available from: http://sharesloth.com/shocking-meth-photos/

Wednesday, 14 October 2015

Researching Female Prisoners - Documentary

I watched the 2009 documentary Female Felons (season 4, episode 1), by Lock Down to get an understanding of the conditions they lived in, the reasons for their convictions and their appearances. The documentary follows the female inmates of Maryland Correctional Institute for Women. In this prison the very high risk offenders, who are highly dangerous and violent, are mixed with the low risk offenders, which causes conflict.

Female Prisoners
GRIGSBY, S., 2014. When the War on Women Meets the War on Drugs [14 October 2015]. Available from:  http://www.dailykos.com/story/2014/12/21/1347205/-when-the-war-on-women-meets-the-war-on-drugs

The documentary focuses on certain inmates to hear their stories of why they are in the prison. One woman was sentenced to 5 years for attempting to sell crack and it is her third conviction  because of her crack addiction. Another inmate got hooked on pain killers, so when her prescription ran out she found drugs from other places and started replying on more dangerous drugs, such as heroine and cocaine. She turned to crime to support her addition and she was convicted of first degree burglary and given an 8 year sentence. Another example is a woman who was given a life sentence after killing a man during an attempted robbery at his home and she was also convicted of carrying a first degree hand gun. She was a drug addict at the time of her conviction.

I noticed that most of the women that were in this prison were uneducated and had abused drugs in the past or are still trying to stop their addiction; these drugs include heroine and cocaine. I want my character to have had a heroine addiction in the past and to therefore have the appearance of a drug addict. I will look into the effects that taking this drug would have on someone and incorporate that into my character's makeup and hair styling.

You are allowed to wear makeup in Maryland Correctional Institute for Women, however after a while I don't think my inmates really care about what the other women think they look like and most of the women wore no makeup at all. There was only one woman I saw in the documentary that had a full face of makeup on and she had been in the prison for over 30 years, however most of the women either had very little mascara on or some lip balm on their lips. The women don't take much time or care on their hair and their hair is either completely down or it has been scraped back into a low, sometimes messy, low ponytail. All the inmates wear very oversized jumpers and trousers that are a jersey material. There are no patterns or logos on the clothing, it is all just one plain colour, usually light grey.

Resources:
Lock Down - Female Felons, 2009[TV]. National Geographic Channel. 14 June 2009.

Monday, 12 October 2015

How to: Create a Mould

Equipment:
-Sticks
-Gloves
-Glue gun
-Clay sculpture on some plastic
-Measuring cups
-Scissors
-Fixing spray
-Petrolease
-Silicone A
-Silicone B
-Scales
-Cling film
-Baby wipes
-Tissues
-Isopropyl alcohol
-Baldiez
-Hair dryer
-Brush
-Deadener
-Silicone pigments
-Metal plate
-Naphtha
-Baby buds

Preparation:
-Label sticks A and B.
-Apply cling film over working surface and scales.
-Apply gloves
-Put the glue gun on so that it can be heating up ready for use later on. Make sure it is leaning on an appropriate surface.
-Clay should already be in a bite shape ready for moulding.


Step by step:
1. Cut the top of the cup off, about 1/3 of the way down.
2. Shake the fixing spray well, go over to an open window, and spray the clay evenly from about 20cm away.
3. Once the fixing spray has dried, spray the clay evenly with some Petrolease, from about 20cm away, again.
4. Place the cup around the wound and use the glue gun to secure the cup to the plastic so that no silicone with leak out. Press down on the cup whilst the glue is drying so that it lies flat. Leave the glue to dry and harden.
5. Put a new cup on the scales and put the scales to 0.
6. Put on some new gloves and take a stick labelled A and scoop out some of the silicone A and put it in the cup until it reaches 30 grams.
7. After the 30 grams has been added to the cup, clean the outside of the pot with silicone A in it with baby wipes and put the lid tightly on.
8. Put some new gloves on and use a stick labelled B with the silicone B and scoop 30 grams of product into the cut with A in it.
9. Clean the outside of the pot of B with some baby wipes and secure the lid.
10. With the same B stick mix the products together well and try to get as little bubbles as possible. If bubbles occur, then tap the cup on the table and they should rise to the surface and disappear.
11. Pour the silicone mixture over your wound so that the silicone completely covers the wound. Do this in back and forth motions to give an even coverage.
12. Let the silicone set for about an hour or until it hardens.
13. Once the mould has set, cut around the glue and pull out the hardened silicone.
14. Wipe the silicone with some tissue and isopropyl alcohol; use baby pubs if necessary.
15. Spray the moulded silicon with Petrolease evenly, from a 20cm distance and let it dry.
16. Create a mixture of 1 part baldiez and 2 part isopropyl alcohol and mix together well.
17. Pour some of this mixture into the dents in your silicone and smooth it away with a brush to blend the edges and coat the wound.
18. Apply a second coat all over the wound and let it dry, You can use a cool hair dryer to speed up this process.
19. Apply some gloves and add 8 grams of silicone A into a clean cup with a stick labelled A.
20. Wipe the pot down with a baby wipe before securely tightening the lid.
21. Apply some new gloves and add 8 grams of silicone B with a stick labelled B.
22. Wipe the pot down with a baby wipe before securely tightening the lid.
23. Using a new stick and some new gloves, add 12 grams of deadener to the mixture to make the silicone softer and more skin-like.
24. Add some drops of pigment to your mixture to make it closer to your model's skin colour.
25. Pour the mixture into the mould to fill the teeth markings.
26. Sweep something flat, I used the metal plate from my kit, across your wound to get rid of any excess mixture and make the product flat with the mould.
27. Put some Naphtha on a baby bud, wipe off the excess, and blend out the edges so that they won't look so harsh on the skin.

I really enjoyed making these wound moulds because it is very mathematical, with all the numbers and measuring, which reminds me of being back in school with my maths and science lessons, which I loved. I had never used many of the products before this lesson so I found it fun introducing myself and experimenting with many new products and mixtures. I found it difficult to take the silicone out of the plastic cup and unfortunately I ripped my first silicone mould, as you can see above. This made me take a lot more care in removing my silicone moulds next time and it also taught me to always check that the silicone is definitely solid enough to some out of the cup. I also noticed that the silicone had quite a few bubbles in it so I made sure that I spent extra time trying to remove the bubbles when I did it again.
When I redid the moulds I decided to do them both at once to be time efficient. Below are my two final outcomes. I am slightly concerned that the detailing in the bottom of the teeth marks aren't going to show up because they don't seem to be covered in the silicone mixture. I will be really disappointed if this is the case and I will have to work really hard when colouring it, to make it look as realistic as possible.
My assessment for these wounds is next week and we are only being taught how to get this pieces out of the mould on the same day so I am concerned that I am not going to have a chance to practice the painting of the wound and I am worried that they won't come out as I wanted and I won't have any time to redo them.

Saturday, 10 October 2015

Researching Human Bite Causes and Possible Characters

Human Bite Causes
A human bite can occur intentionally, where another person, or the person themselves, has deliberately done it. An example of this could be in a physical fight, where someone could bite into someone's skin and cause bleeding and bruising, or where someone's body part, like the ear or nose, could be ripped off. Other examples could include sexual assault, child abuse or self harm/self mutilation.

The human bite could also be accidental if, for example, someone's mouth collides with a body part in sport or a fight. In a physical fight someone could be punched in the mouth and that would cause a human bite on their fist. Depending on how hard these collisions are, the hand can have serious injuries and could get infected if not treated properly. Someone could accidentally catch their teeth on someone's body, causing either a little indent or a more serious injury.

More subtle human bites could include biting finger nails and around the nails; this could cause infection. An example of a bite that people wouldn't necessarily think of as one, would be when a mother/father kisses or sucks on a child's cut or other open wound because this can easily cause infection. Another common human bite is the 'love bite' or 'hickey' where someone bites onto the skin and sucks it. This can be harmless if the skin is not broken, however sometimes this can be taken too far and could be classed as abuse, especially when seen on children.

Self Mutilation
I have chosen self mutilation as the cause for my human bite. Self mutilation, or self harm, is when someone intentionally causes themselves pain to torture hurt or punish themselves. Examples of self harm could include cutting the skin, severe scratching, burning, ripping of hair or needle stabbing; however I will be doing human bites. Some forms of self harm are with the intention of killing themselves, however the self harm I will be showing, will not have had that intention.

A common conception of self bodily harm is to get attention, however this is not usually the case. Many people self harm in places where other would not see it, because they are ashamed of doing it and don't want other people to see it; they want to keep it a secret. Self harm is most commonly caused by deep emotional pain, however there is no one reason for people to do it. Many people who self harm say that they do it to escape from their emotional pain because they are having to think about a different kind of pain. Some people say that when they cut themselves and feel pain it makes them feel alive, instead of numb or dead inside. Some say it is a way of relieving stress or built up anger. Some say self harm is a way of having control over themselves and their body, maybe that they feel they don't have in other aspects of their lives.

The emotional pain that could cause self harm could be caused by a great number of things, including abortion, divorce, poor body image, low self-esteem, rejection or drug/alcohol abuse. There isn't a certain group of people who are more likely to self harm, however there are people who may be more likely to self harm. These include people ages between 15 and 25, people who live in residential care, drug or alcohol abusers, people with learning disabilities and prisoners. Self harm may be more common than people think as one study showed that roughly 40% of college students have self harmed themselves at least once.

Developing my Character
After researching different reasons that could cause human bites and the most commonly affected people, I have decided that my character will be a female prisoner who self mutilates/self harms. According to a BBC News report, self harm in 'four times more likely' to happen in female prisoners. The report also claimed that according to Oxford University researchers, even though women 'make up only 5% of the prison population but account for half of all self-harm incidents'. The report said that scratching and cutting was the most common form of self harm, however I my character will have self harmed through biting hard on her arm. I may also include scratches on her arm and possibly her neck to show other forms of self harm. Prisoners are very limited with what they can take in to the prison as self harm and suicide is such a risk, so biting themselves would definitely be an option for them to self harm.

An example of female inmates.
NBC NEWS, 2012. America's only all-female chain gang toils in Phoenix heat [10 October 2015]. Available from:  
http://photoblog.nbcnews.com/_news/2012/06/28/12456752-americas-only-all-female-chain-gang-toils-in-phoenix-heat?lite
I am going to look into females prisoners and see how they are treated and therefore see how they may look, what they may wear and how healthy they may be. I want my character to look as realistic as possible so the makeup I will do will be very subtle and natural looking. I will also look into the crime that my character may have committed and therefore the reason she is in prison and the length of time she has been in prison for.

Resources:
BALENTINE, J., 2015. Human Bites [10 October 2015]. Available from: http://www.emedicinehealth.com/human_bites/article_em.htm

SALTERS-PEDNEAULT, K., 2015. Self Mutilation [10 October 2015]. Available from:
http://bpd.about.com/od/understandingbpd/a/selfharm.htm

PEARLMAN, J., 2015. Why Do People Self-Harm? [10 October 2015]. Available from:
http://www.thesite.org/mental-health/self-harm/why-do-people-self-harm-5680.html

BBC, 2013. Self-Harm 'four times more likely' in Female Prisoners [10 October 2015]. Available from: http://www.bbc.co.uk/news/health-25366160

Tuesday, 6 October 2015

Special Effects Health and Safety

Always follow these steps when experimenting and using special effects makeup equipment:
-Do NOT contaminate A or B, either together of with something else!
-Use different gloves when dealing with A and B to stop contamination.
-Use different sticks to scoop out the product or to mix the products.
-Don't use anything Aloe Vera based when using the products.
-Always use an even amount of products A and B when mixing them together to get the right consistency.
-Always make sure you mould is completely clean and dry before using because otherwise whatever is left in the mould will be in the next prosthetic piece.
-Always spray the setting spray by an open window.
-Make sure your kit is always clean so that the products can last for as long as possible.
-Always make sure all the products are stored correctly, i.e. in a cool place, with the bottles upright and with lids on.
-Make sure you powder the latex well so that they don't stick together.
-Wear clothes that you don't mind getting ruined because latex is almost impossible to get out.
-Tie your hair up and don't wear jewellery.